Friday, December 13, 2013

Unity Runtime Editing

Skip to end of metadata
Go to start of metadata
In Unity any changes made to a scene while the game is running are not saved, but there is a simple way work around this instead of writing down every variable changed.

Step-by-step guide

  1. run the game and make the required changes to an object.

  2. right click on the object (or script) in the hierarchy and select copy component.
  3. end the running session.
  4. go to the object in the hierarchy or the prefab version in the assets.
  5. right click on the object or script and select paste component as values.

Monday, December 2, 2013

Sale today for students who want a copy of Unity 4 Pro + Team License


The good folks at Studica are offering a Cyber Monday (until Dec 6) sale on Unity 4 Pro licenses.  If you're a student and you want the power of the latest version of Unity Pro, definitely check it out.

It also includes a copy of the Team License (essential for collaboration!).


(One Year License with Team License- windows/Mac Download)
$130

Take care,
-John "Pathfinder" Lester
Chief Learning Officer, ReactionGrid

Monday, September 30, 2013

Jibe Limited Starter Program Now Available

Are you currently in Second Life or OpenSim?

Want to convert your prim-based creations into mesh models that you can bring into a web-based Jibe world? 

You can use the Singularity viewer to export your prims as mesh objects and import them into Unity in a flash.  And our new Jibe Limited package is the best way to start your exploration of Unity3d and Jibe!


Jibe Limited provides a license for a single developer to publish one Jibe world to a hosted web space for 2 months with support for up to 15 concurrent users.

Jibe Limited costs just $25 per month + a one time $25 setup fee.

With the 2 Month Starter Program you get access to documentation and an online support suite to help you along.

After your 2 month term, renewal options at $25 per month will be available as well as upgrade options (e.g., higher concurrency, registration database, inworld metrics).


Jibe Feature Highlights

  • Web-plugin for browser based virtual worlds. 
  • Desktop Windows and Mac standalone version.  
  • Option to convert Jibe world into Android mobile app (additional charge)
  • Group and private chat capable.  
  • Hyperlinks in chat.
  • Sit scripts and related animations provided.
  • Teleport scripts for current level, rooms & Jibe worlds.
  • Free editor at Unity3D for creating the 3D world.
  • Import mesh files from Opensim, Second Life, Sketchup, Maya, 3DS & more.
  • Use Singularity to Export from Second Life or OpenSim as mesh models.
  • Script in industry standard C# or JavaScript.
  • NVIDIA Physx physics system.

For more information and demos of Jibe, please see our website or send us a support ticket with your questions.

Wednesday, July 31, 2013

Oculus Rift and Razer Hydra Integration is Coming Soon to ReactionGrid's Jibe Platform

This short video explains and illustrates the functionality of Oculus Rift and Razer Hydra in a Unity3d-based environment.

The live demo part of this video was filmed in Unity's Tuscan Villa demo environment modified by Sixense, the company that created the Razer Hydra device. We’ll be building on their fantastic work to integrate the Razer Hydra and Oculus Rift with our Jibe platform in the coming months.


At ReactionGrid, we're integrating these new hardware devices with our Jibe virtual world platform, thereby giving people the ability to create their own web-based multiuser 3d environments that are fully immersive.


Wednesday, July 24, 2013

Setting up multiple spawn points for a scene in Jibe and Unity3d

In this tutorial we'll be going over how to set up spawn points when teleporting between Jibe scenes.  By default there is only one spawn point in a scene, this can be inconvenient if you have many exits and only one entrance (ie. buildings). Thankfully setting up spawn point is pretty easy.

First make sure that you have at least two Jibe ready scenes. for the purpose of this tutorial I'll show two blank scenes using the first as a "sender" and the second as a "receiver". Each scene can be used as both "sender" and "receiver" but for simplicity sake I will be separating the two.

Now lets go ahead and set up the receiver scene:

Step 1 - create once cube for every location you want the player to be spawned in and remove any scripts attached to them.

Step 2 - this step is optional but I highly suggest doing it for organization. Name the cubes you created accordingly (ie. clinicSpawn, houseSpawn etc.)

Step 3 - in the NetworkController script there is a list named SpawnPoints. Set up that list to include every point you want to work as a spawn and then write down which index number goes with each spawn point (this will make things easier later).


The receiver scene is now finished and ready to spawn players so next we need to set up the sender scene:

Step 1 - similar to the receiver scene, create a cubes and place the wherever you want the player to teleport from and name them accordingly.

Step 2 - Attach the script LoadNextLevel to each of the sending cubes and set up the script to look like this:


Step 3 - the last variable in the script is called "Next Level Spawn Point Index" this is where you choose which spawn point to spawn at. Remember that list of spawn points you wrote down earlier, this is where you need it, each index number points to a specific spawn point and this variable is how you tell the teleporter where you drop the player off.

Everything should be all set up and ready to go so test away.

P.S. You can also find this article on our Jibe 2.0 Manual Addenda page in our public Knowledge Base!


Wednesday, May 29, 2013

How to create multiuser networked events in Jibe and Unity3d using iTween

In Jibe 2.0 we've included an easy system that gives you the power to use iTween to create multiuser networked events.  This allows you create shared experiences between avatars using interactive and complex object animations.

Watch my tutorial to learn more!


Video: How to create multiuser networked events in Jibe and Unity3d using iTween


Take care,
-John "Pathfinder" Lester
Chief Learning Officer

ReactionGrid, Inc.

Monday, April 29, 2013

How to create Avatar Sit locations on any object in a Jibe world in Unity3d


Here's a short tutorial video that will show you how to create avatar sit locations on any object in your Jibe world.  It's a very powerful and flexible system where you simply drag and drop sit locations onto anything in your multiuser Jibe world, allowing you to easily create collaborative meeting environments that encourage avatars to gather together in groups.
In this video, I also review how to avoid the accidental misuse of a script that could potentially cause your Avatar to fall through the floor.  Safety First!


Creating Sit Locations in Jibe and Unity3d from John Lester on Vimeo.

Take care,
-John "Pathfinder" Lester
Chief Learning Officer, ReactionGrid

Thursday, April 11, 2013

Breakdown of Oculus Rift Virtual Reality Headset and Integrating with Unity3d and Jibe


I'm eagerly awaiting my own developer version of the Oculus Rift, which should arrive in about a month.
My plans are to immediately start working on how to best integrate it with Jibe and Unity3d.  
In particular, our newly released Jibe 2.0 has a built-in 1st-person perspective mode that is ideal for things like virtual reality headsets.


Exploring a multiuser Jibe 2.0 world in 1st-person perspective.  

Keep an eye on this blog for future details.
Needless to say, I was very excited to see the folks at iFixit posting a great teardown of the developer version of the Oculus Rift headset.

If you have an Oculus Rift and would like to brainstorm with me on how it can be integrated with multiuser virtual world applications, please drop me an email (pathfinder@reactiongrid.com) or post in the comments.
Perhaps we can also schedule a Team Fortress 2 game while using our headsets!
-John "Pathfinder" Lester
Chief Learning Officer, ReactionGrid Inc.

P.S.  ReactionGrid's Lead Developer Matthew Bertrand is also getting an Oculus Rift dev kit.  He's pretty psyched about it, and we all expect amazing things from him!

Monday, April 8, 2013

How to embed and play a movie on an object in Unity3d and Jibe


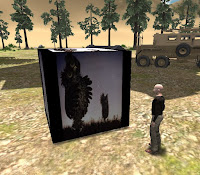
Watching "Hedgehog in the Fog"
in my Jibe world.

Note: You'll need the Unity Pro editor if you want to work with Movie Textures in Unity3d.
Unity3d allows you to embed and play videos on any surface in a 3d environment.
This means you can easily create a web-based Jibe world where avatars explore a multiuser 3d virtual space while watching videos or movies playing on screens/signs/any surface you wish.
The most common way to add video to a Unity3d project is by adding a video file to your project's Asset Folder, which automatically creates a Movie Texture (details here).
However, adding a video file directly to your project means the size of the video file will be added to the final size of your completed Unity webplayer file.  In other words, if your video clip is 50 Megabytes large, then your Unity webplayer file will have an extra 50 Megabytes added on to it.
For folks creating Jibe worlds with Unity3d (or anyone creating Unity webplayer files for streaming on the Web) this is not good.  You always want your webplayer file to be as small as possible so your webplayer file will finish downloading and start running as quickly as possible.
Fortunately, there's a way you can download/stream a movie from the Web so it doesn't add to the size of your Unity webplayer file.  Unity will immediately start playing the movie as soon as it has buffered enough of it, similar to how YouTube works.
Here's a simple example:
Step 1: Get your video ready as an OGG file on the Web

Unity needs videos to be in OGG format (file extension .ogg).  If you need to convert an existing video file into OGG format, I suggest using VLC (it's free and cross platform).  Take your OGG video, put it on a webserver somewhere and remember the URL.

Important Note: If you're managing your own webserver, be sure it has the MIME type for Ogg Vorbis enabled.  For Extension use .ogg, and for MIME type use application/ogg.
Here's a sample 60 Megabyte OGG video I made and uploaded to Wordpress.  Feel free to use this URL in your own tests.  You can also click on it to see how it plays in your browser.
http://becunningandfulloftricks.files.wordpress.com/2013/04/hedgehog_in_the_fog.ogg
Step 2: Create a Cube


In this example, we're going to make a basic cube and have the video play on its surface.  Of course you could flatten the cube so it looks likes a screen and then place it on a model of a TV or something.  I'm just being lazy.

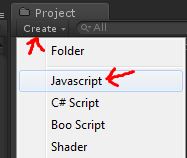
Step 3: Create a new Javascript


I like the name of a script to remind me what the script actually does, so I'm going to call this new script ClicktoPlayWebMovie.


Here's the code.  Copy and paste this into your new script and save it.


var url = "http://becunningandfulloftricks.files.wordpress.com/2013/04/hedgehog_in_the_fog.ogg";
function OnMouseDown () {
 // Start download
 var www = new WWW(url);
// Make sure the movie is ready to start before we start playing
 var movieTexture = www.movie;
 while (!movieTexture.isReadyToPlay)
 yield;
// Initialize texture to be 1:1 resolution
 renderer.material.mainTexture = movieTexture;
// Assign clip to audio source
 // Sync playback with audio
 audio.clip = movieTexture.audioClip;
// Play both movie & sound
 movieTexture.Play();
 audio.Play();
}
// Make sure we have audio source
@script RequireComponent (AudioSource)
function Update () {
}
You can see at the top of the script that I've included my demo URL as the default movie URL.  You can always change it later.
Step 4: Add ClicktoPlayWebMovie script to your cube


Drag the ClicktoPlayWebMovie script from your Project folder onto the Cube in your Scene view.  This will add the script to the cube.


Now select your Cube in the Scene view and look at the Inspector settings.  You can change the movie URL by simply editing the URL field in the Inspector.
Also notice that there is an Audio Source added to the Cube.  This was added automatically when you added the script to the Cube, since the script needs an Audio Source component to work.  Don't delete or modify the Audio Source component.  Just leave it be.


Step 5: You're done.  Test it out!


You can run your Jibe world locally in the Unity editor and test it out that way.  Walk up to the cube and click on it.  The movie will start playing on all surfaces of  the cube.


Enjoy!
-John "Pathfinder" Lester
Chief Learning Officer, ReactionGrid Inc.

Tuesday, April 2, 2013

How to Fix the Unity Asset Server error "Cannot Start Service" on Windows

The Unity Asset Server is a fantastic tool for version control and collaborating with a group of people on a project in Unity3D.  Our customers primarily use Windows servers, and some of them are running their own Unity Asset Servers to facilitate working together on Jibe projects.

We just learned of a bug that might affect folks running their own Unity Asset Server on Windows.  Fortunately it's not serious at all (just annoying as heck), and the fix is incredibly easy and permanent.  

Are you running the Unity Asset Server on a Windows machine?

Has it suddenly stopped working, refusing to start no matter what you do?

Do you immediately see the following popup error when using the Unity Asset Server Control Panel?


Monday, April 1, 2013

Jibe 2.0 Now Available

Jibe 2.0 Now Available!

We are pleased to announce Jibe 2.0!
This is not an April Fools joke.  Jibe 2.0 is now available.  Please see our Press Release for all the details.


And if you are already a Jibe Mars customer, we have a sweet treat for you.  You can grab Jibe 2.0 for free with your subscription to Jibe Mars!

We also have some special deals for those clients on Jibe Moon, Atmosphere and Oceanic as well as our Behind the Firewall clients and Self Hosted Jibe kit users.

Please contact us for more information via our Support Portal.  Just submit a Support Ticket with any questions or to find out if you qualify for any of our special discounted upgrades.


Friday, March 22, 2013

ReactionGrid Inc. is proud to announce Jibe 2.0 Release Date (and a Reminder about Copyright and Open Source)


On April 1, 2013 ReactionGrid Inc. will make Jibe 2.0 available for purchase. Originally we were set for a point release of Jibe as 1.5, but the longer we worked to improve our product the more we realized that we had actually created a full version release with major improvements and new feature sets.

  • Room variable support
  • Unity 4 support
  • Photon 3 & Photon Cloud support
  • Improved avatar pipeline to enable wider range of custom avatars
  • Reduced requirement for naming conventions for avatar outfits when customizing appearance options
  • Animations can have any name, and are mapped to known animation states via a simple script set up in the Inspector (makes it much easier to grab animations from places like the Mixamo store to add simple gestures to your avatars)
  • Appearance maps can support model, hair and outfit choices out of the box, the goal is to move towards a more extensible system
  • Storage and retrieval of avatar dressing choices for Jibe Mars customers for future implementation of immediate login of pre-dressed avatars.
  • Simplified networking scripts for position updates of objects
  • Recategorized Jibe scripts in Unity hierarchy for clearer organization
  • Increased flexibility on login process
  • Change from three scripts (ChooseAvatar, DressingRoom, SingleSceneConfiguration) for choosing avatars and logging in, to one single simplified script (JibeLogin)
  • Combine Loader and Dressing room concepts into a Login scene where you can choose all outfit choices on login.
  • Or you can change which scene is the first in the build order and log in directly to the main scene where the activity will take place
  • Dedicated dressing room can be reached from any other scene in the build and should return you to the last known location
  • Extra sample scripts for more common functionality (such as taking screenshots from inworld)
  • Spatial audio support for Vivox voice on web player builds
  • Chat history plus ability to chat from the webpage (removing the need to have the chat textbox on screen all the time while inworld)
  • Single player mode for offline testing - extremely useful for debugging while not connected, or for doing a demo from behind a tight firewall
  • Improved event tracking scripts for capturing additional information about user interactions
  • Improved tracking of Account UUID (Unique Identifier for a logged in user) for use within websites where tracking by known ID is important. This feature enables both understanding of the current ID of the player from the multiplayer server perspective and from a user-maintained system.
  • 100% C# codebase with final scripts converted from Javascript.
  • Updated Jibe manual with full information on each of the new features in the platform!


We've also updated our Jibe Web Suite for our hosted and behind firewall server customers to include a rich administration site and support for groups and role based permissions to give you more control over access to your Jibe worlds.

One reason why Jibe is such a powerful 3d simulation and virtual world platform is because the majority of the source code of Jibe is viewable and modifiable by our customers. This gives Jibe users the ability to fully customize their projects. However, we’d like to remind everyone of ReactionGrid’s copyright ownership and licensing agreement.

ReactionGrid Inc. owns the copyright to the Jibe project kit software as well as the server-side application code (i.e., the “JibeWebSuite”). No part of Jibe is Open Source, nor is there any legal fork of the Jibe code. It is not ReactionGrid Inc.’s intention to release Jibe as Open Source, and any 3rd-party release and/or reselling of Jibe is a violation of copyright law.

For more details on ReactionGrid Inc.’s Jibe Software License, please see our knowledgebase article.

Wednesday, January 30, 2013

ReactionGrid Inc: Growth and Change in 2013

Growth and Change always happen together. For something to evolve and flourish, it must grow.

And you cannot have growth without change.

ReactionGrid Inc. is growing and changing. Over the past year you've seen us shift away from Opensim to focus on developing our own proprietary web and mobile-based Jibe platform. You've also seen us evolve into a production studio that provides custom development services for educational 3d simulations using Jibe and Unity3d.

In 2013, you will see us continue to grow. We're working to expand our in-house videogame and instructional design expertise so our team can create the highest quality custom learning simulations. We're enhancing many of Jibe's core features to make it the most compelling multiuser 3d simulation environment out there, with the ability to coordinate complex data flow between virtual and physical world devices. And we are starting some major new projects with clients who are exploring amazing opportunities in the areas of immersive education and deeply engaging learning.

Along with all this change comes changes in leadership. Chris Hart has left her position as CTO to pursue her own ventures in data visualization, and she has handed over her lead developer role to Matthew Bertrand. Matt's been working with ReactionGrid for several months now, and we're very excited for him to take on this new challenge. Chris will remain an active contributor on the Jibe Unity Google Group in case anyone wants to pick her brains about all things Jibe.

At the helm of ReactionGrid, we're very excited to have Robin Donnelly now leading the company as President and COO. Robin's years of management and business development experience will be a great asset during this new phase of ReactionGrid's evolution. And lastly, Kyle Gomboy has left ReactionGrid to pursue his own projects. We wish him the best of luck.

We've got a great core team moving forward (see our updated About Us page), and we'll be continuing to expand our expertise while exploring how to integrate virtual worlds with some fascinating emerging technologies.

Keep an eye on this blog. We plan to surprise you in many wonderful new ways.

-The ReactionGrid Team


Friday, January 18, 2013

How to create Wandering Animals in your Jibe world using Unity 3D Pro


A great way to breathe life into your Jibe world is to add animated animal models that wander around the 3d landscape.  Here's how you can do it using the Pro version of the Unity3D editor.
The Unity Asset Store has many great models available for low cost that can make your Jibe space come to life. Just run a search for Horse or Cow and you may find just the model you're looking for. To make roaming animals, look for animals that come complete with animations. Mixamo produce many models that work well in Unity, though there are plenty of other publishers you can choose from. For this simple ambient animal example, you need just two animations - one for a stationary animal (so an idle / grazing animation) and a walk or run.
Step 1 - place animals and place empty cubes that the animals will walk to.  If you want the cubes to be specific per animal than you can place them in the animal object in the Hierarchy for organization but it doesn't matter where they are in the Hierarchy for performance. Making the cubes specific to an animal (by dragging those items into the hierarchy of the animal) then you can move the animal and the relative waypoints together in edit mode more easily.
Step 2 - Set up the Nav Mesh. to do this go to the Windows menu and open the Navigation window located towards the bottom of the list
Next select from the Hierarchy any objects that you want the animals to avoid such as buildings, fountains etc. In the Navigation window under the Object Tab those objects will appear with two check boxes and a drop down. Check off the Navigation Static check box to make it true, this will prevent the Nav Mesh from going under or through these objects. Next select the Terrain from the Hierarchy and check both Navigation Static and OffMeshLink Generation
Now in the Navigation Window click on the Bake Tab located next to the Object tab (do not press the Bake button at the bottom of the Window yet).  These settings will determine the accuracy of the Nav Mesh:
  • Radius - how close to walls the Nav Mesh will generate.
  • Height - how much clearance is required for the Nav Mesh to go under a floating object.
  • Max Slope - the steepness of a slope that Agents can traverse.
  • Step Height - the step-up height Agents can traverse between levels.
  • Min Region Area - the smallest amount of space that the Nav Mesh can exist in.
  • Width Inaccuracy % - how inaccurate the horizontal distance from wall and ledges the Nav Mesh is.
  • Height Inaccuracy % - how inaccurate the vertical distance between the terrain the Nav Mesh is.
The Generate Off Mesh Links are for special actions of Agents being able to jump across gaps and drop down from ledges.
When everything is set up the way you want it click the Bake button located at the bottom right of the Navigation Window.
Step 3 - setting up the Animal AI. Download RGScripts.rar (includes AutoAnimateNPC.cs and NavigateToTarget.cs).  The below picture are the four scripts that will need to be on the animal to allow them to walk around.
  • Animation - Set up the animations that the Animal will be able to do.
  • Nav Mesh Agent - The most important of the scripts, this is what attaches the animal to the created Nav Mesh. Most of the settings in here are straight forward, the Radius is a collision sphere that tracks where the animal is on the nave mesh, speed is how fast the animal will move, height is how tall the Nav Mesh collision sphere is (so if there is a bridge that can be walked under and the height is set too high the animal won't be able to get under the bridge.
  • Auto Animate NPC - plays the correct animations when walking or idle.
  • Navigate To Target - sets the targets that the Animal can walk to.  This script will talk to the Nav Mesh Agent selecting a random destination from the list and passing that position to the Agent.
When you are happy that all works as it should, make all the targets invisible by turning off their Mesh Renderer component and removing their box collider components so you won't end up bumping into invisible boxes as you walk through the scene.
Step 4 - Run the game and enjoy.

-Matt Bertrand
Jibe Developer, ReactionGrid